Demystifying the Gear and Dungeons in Puzzle Quest 3
What gear does my hero need? How high should my gear score be? Where can I go to level up?
We know that both gear and dungeons can seem a bit overwhelming sometimes. There are a great many numbers of ways to gear up and go dungeon crawling in Puzzle Quest 3, but we’re here to offer players a few tips and tricks to keep in mind when thinking about gear and dugeons.

1. Gear Score avoids being sore
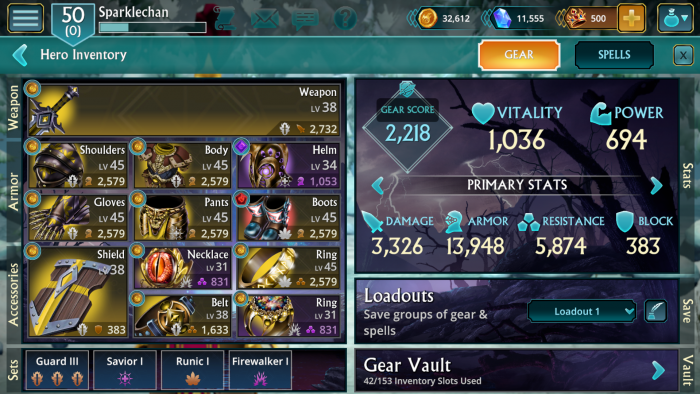
Puzzle Quest 3 has 15 main chapters at launch for hours upon hours of match 3 fun. While your match-3 making prowess might breeze through the first few chapters, you’ll soon have your micromanaging muscles tested as the enemy difficulty ramps up. This difficulty, indicated by the Enemy Score, does not scale with your character. Instead, it scales based on the chapter you’re on. If you find yourself stuck on an enemy, be sure to level up your gear to bring your Gear Score within 10-20% of the Enemy Score to optimize your survivability. That’s just a rule of thumb though, many adventures are still able to progress through tough enemies with much less.
2. Pairing is Caring
There are 15 gear sets in the game that can be farmed specifically in each chapter of the main story quests. Each offers its own blend of unique benefits such as buffs, debuffs, extra gems, etc etc. What makes them even more unique is these gear pieces also provide added bonus when you pair 2, 4, or 6 pieces together. Which sets you decide to pursue depends on your classes, but here’re a few examples.
Necromancer’s Death Lance Ultimate Spell benefits from maximizing your accumulation of Skulls on the gameboard so farming the Bone Set for at least 2 pieces will be useful for a 45% chance to create a skull at the start of your turn.
Berserkers also focus on Melee damage and skulls on the board, can benefit from the Bone set and also Warlord set for critical hits
Assassin’s Night Blade Spell increases damage dealt by the number of purple Gems on the board, so using the Night Set bonuses will help add more Purple Gems to the board, increasing your damage and helping fill your Purple Spells more quickly.
Shamans also benefit from the Serpentine set which inflicts poison when matching green gems and increases power when your enemy is poisoned. They rely on building up a lot of mana for their Good Juju spells to create even more green gems on the board. One excellent way to increase your mana build-up is by equipping 4 pieces of armor from the Royal Set. The 2-piece bonus gives an 80% chance for Big Gems to increase by 1 size and the 4-piece bonus converts mana gems to Big III gems. These bonuses help contribute immensely to a game board full of beautiful green gems at the Shaman’s disposal.
Paladins can benefit from pairing similar elemental Spells. Spells have a bonus when you pair 2, 3, and 4 like elemental spells together for a +20%/40%/70% mastery bonus. If you’re using spells of the same color make sure to put a channeling spell (examples: Channel Poison, Channel Fire, etc) upfront to help fill your other spells of the same color. If you use spells of different colors a set like the Dragonguard will give more benefits the more different elements you use.
Revisit Dungeons
Speaking of gear! Once you’ve figured out the gear that’s right for you, you’ll want to revisit previously completed dungeons to farm for their unique drops. Each of the 15 dungeons in the game are associated with specific gear sets so here’s a helpful list to get you familiar with each gear set/dungeon pairing.
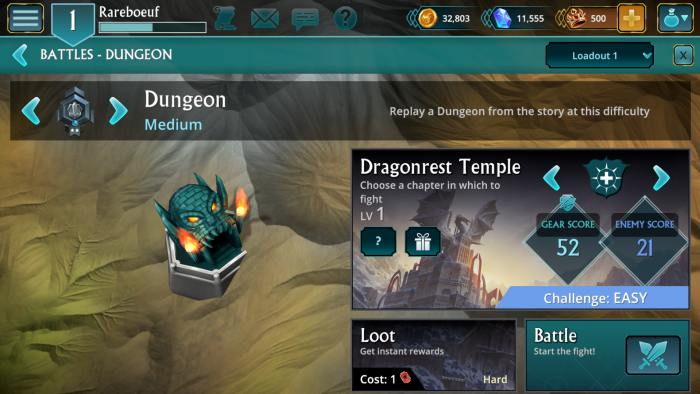
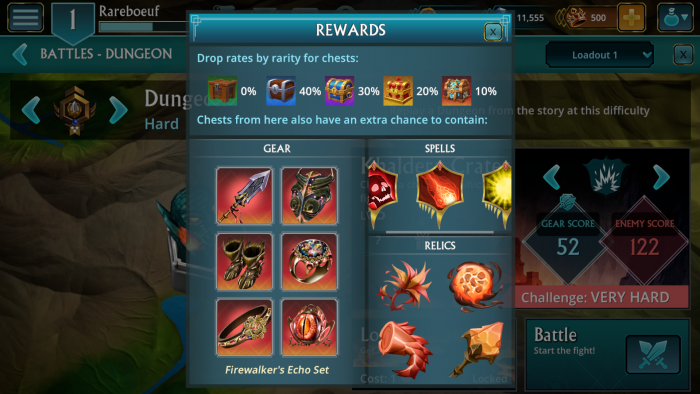
Need a list of every gear set and where it’s located? Here’s a handy dandy list! You can see this information by clicking on the present box icon when viewing individual dungeons. You’ll see the potential gear set, spells, and relics that may show up in chests won from a dungeon.
Chapter 1: Dragonguard Depths
Set: Guard of Bartonia
2 Pieces: Increase Block Chance by 2% for each Big Gem on the board
4 Pieces: Gain +5% Starting Armor
6 Pieces: Increase Power by 3% when an enemy is defeated
Chapter 2: Ruins of Morsauloth
Set: Gwendholyn’s Royal Legacy
2 Pieces: Big Gems have a 50% chance to be 1 size larger (Max X)
4 Pieces: Covert 2 mana gems to Big III gems at the start of battle
6 Pieces: Increase Power by 2% for each Big Gem on the board
Chapter 3: Dragonrest Temple
Set: Peace of the Savior
2 Pieces: Gain +5% Starting Resistance
4 Pieces: Increase Healing Boost by 1% for each Yellow Gem on the board
6 Pieces: There is a 10% chance to get Barrier when matching any Big Gem
Chapter 4: Clockwork Halls
Set: Dwarven Machine Set
2 Pieces: If you or the enemy are Burning, spells have a 50% chance to gain 5 Mana each turn
4 Pieces: Matching any Big Red Gem heals you for 2% of your Max Life
6 Pieces: Increase Elite Damage Protection by 0.75% for each Red Gem on the board
Chapter 5: Council of Scales
Set: Memory of Kelthurax
2 Pieces: Gain +2 mana for each of your regular spells at the start of battle
4 Pieces: Increase all Elemental Damage Bonuses by 5%
6 Pieces: Increase all Elemental Resistances by 5%
Chapter 6: Khaldera Crater
Set: Firewalker’s Echo Set
2 Pieces: There is a 35% chance to create Red Gems at the start of your turn
4 Pieces: Inflict Burn on your enemy for 2 turns when matching 6 or more Red Gems
6 Pieces: Gain Haste for 2 turns when casting your Ultimate Spell
Chapter 7: Mount Gobknocker
Set: Warlord’s Rising Set
2 Pieces: Increase Power by 1% for each Skull Gem on the board
4 Pieces: Increase Critical Hit Damage by 30%
6 Pieces: Increase Critical Hit Chance by 10%
Chapter 8: The Doomholt
Set: Doom of Night Set
2 Pieces: There is a 35% chance to create 2 Purple Gems when casting a Spell
4 Pieces: There is a 25% chance to gain 10 mana for your Ultimate Spell when casting a regular Spell
6 Pieces: There is a 3% chance to fill your Purple Spells when matching 4 or more Purple Gems
Chapter 9: Wyrmheim
Set: Serpentine Scale Set
2 Pieces: Inflict Poison on your enemy for 2 turns when matching a Big Green Gem of size III or higher
4 Pieces: Increase Power by 1% when a Green Enemy enters battle
6 Pieces: Increase Power by 5% if your enemy is Poisoned
Chapter 10: Pharos of Lothdyn
Set: Jeweled Light Set
2 Pieces: There is a 35% chance to convert a Purple Gem to a Yellow Gem each turn
4 Pieces: Increase Light Resistance by +5%
6 Pieces: Inflict Blind on your enemy for 2 turns when matching 5 or more Yellow Gems
Chapter 11: Azurite Halls
Set: Runic Crystal Set
2 Pieces: There is a 25% chance to create 2 Skulls when casting a regular spell
4 Pieces: Inflict Hex on an enemy for 2 turns when my Armor or Resistance reach 0
6 Pieces: There is a 30% chance to gain Reflect when casting a regular Spell
Chapter 12: Bridge of Mortnath
Set: Fall of Esgaard Set
2 Pieces: Increase Healing Boost by 5%
4 Pieces: Heal 1% of Max Life at the start of your turn
6 Pieces: There is a 25% chance to reduce any negative status effect’s duration to 1 turn
Chapter 13: Ruins of Lunarion
Set: Elven King’s Fury Set
2 Pieces: Start each battle with 2 mana in your Ultimate Spell
4 Pieces: The Heroic Effort buff has a 25% chance to last for 2 extra turns
6 Pieces: Gain 5% more mana when matching Gems
Chapter 14: Skullgard Keep
Set: Bone Defender Set
2 Pieces: There is a 25% chance to create a skull at the start of your turn
4 Pieces: Heal 5% of Max Life when an Undead enemy is defeated
6 Pieces: Big Skull Gems have a 25% chance to be 3 sizes larger
Chapter 15: The Portal of Blood
Set: Bane’s Bloodfang Set
2 Pieces: Increase Ice Resistance by 1.5% for each Blue Gem on the board
4 Pieces: There is a 25% chance to inflict Freeze on your enemy for 3 turns when you cast a spell
6 Pieces: At the start of your turn, if there are 8 or more Blue Gems, create 2 Skull Gems
Revisiting dungeons can also help you level. If you’re finding the main story chapters too challenging, replaying older dungeons can be a great way to help level your hero or your alternate. Replaying dungeons can also help you develop and test your strategy against foes, ensuring victory the next time you meet. The best way to steel yourself for the battle-laden road ahead is to practice!
With these tips in mind, try your own variety of gear sets and spell pairings to outmatch and defeat your opponents! We hope this blog has helped you wrap your head around some of the systems in Puzzle Quest 3.
Stay up to date by joining the Puzzle Quest 3 community!